cd /usr/local/src/

wget https://www.python.org/ftp/python/3.7.1/Python-3.7.1.tgz

tar zxvf Python-3.7.1.tgz

cd /usr/local/src/Python-3.7.1

yum groupinstall 'Development Tools'

# ncurses-develは、bpythonを使わないなら不要
yum install openssl-devel libffi-devel ncurses-devel

./configure prefix=/usr/local/python3.7;make;make install

Gsuiteユーザーのメール容量をAPIから取得する
これはAdventure Advent Calendar 2018の8日目の記事です。
ユーザーとしてAPIを使って、Gmailのメールを方法はいくつか見つけましたが、管理者視点での操作をしている情報が少なかったので、備忘録として残します。
特定のユーザーがメールが一杯になってしまうと、送信側であるお客様や取引先に迷惑が掛かるので、Gsuiteの管理者の視点として
GsuiteユーザーのGmailの容量(標準だと30GB)の利用統計を取りたい。
というのがあると思います。
ですが、Thunderbirdなどのメーラーを使ってGmailを使っている人は、今の容量を知る術がありません。
そこで、日時でGsuiteの全ユーザーの情報を取得するスククリプトを書いて、日時で回して運用する事にしました。
作成したコードは以下になります。
※事前に、
・ Gsuite APIの有効化(https://support.google.com/a/answer/60757?hl=ja)
・ OAUTHを使うユーザーのGsuite内権限の割り当て(https://support.google.com/a/answer/142566)
・ OAUTH認証設定(https://console.cloud.google.com/apis/credentials/consent?)
を行なって下さい。
コード
#!/bin/env python3/7

import os
from datetime import datetime, date, timedelta
import httplib2
from apiclient import discovery
from oauth2client import client, tools
from oauth2client.file import Storage
from bigquery import get_client
import requests

in_date = datetime.today()
in_date = datetime.strftime(in_date - timedelta(hours=48), '%Y-%m-%d')

def main():
    try:
        import argparse
        parser = argparse.ArgumentParser(parents=[tools.argparser])
        flags = parser.parse_args()
    except ImportError:
        flags = None

    # 認証情報を格納するディレクトリ「.credentials」の設定。ディレクトリが無い場合は作成
    credential_dir = os.path.join(os.path.expanduser('~'), '.credentials')
    if not os.path.exists(credential_dir):
        os.makedirs(credential_dir)

    # 認証ファイルのパスを設定と読み込み
    credential_path = os.path.join(credential_dir, 'admin-directory_v1.json')
    store = Storage(credential_path)
    credentials = store.get()

    # 認証ファイルが無い場合は作成
    if not credentials or credentials.invalid:

        # 使用する機能の範囲を設定
        scopes = [
            'https://www.googleapis.com/auth/admin.reports.usage.readonly',
            'https://www.googleapis.com/auth/admin.reports.audit.readonly'
        ]

        # 認証キーの設定(~/.ssh/gsuite-admin.json)
        secret_key = os.path.join(os.path.expanduser('~'), '.ssh', 'gsuite-admin.json')

        # 認証キーから認証処理を行うクラスのインスタンスを生成
        flow = client.flow_from_clientsecrets(secret_key, scopes)

        # アプリケーションの名前
        flow.user_agent = 'Gmail Check'

        if flags:
                credentials = tools.run_flow(flow, store, flags)
        else:
            credentials = tools.run(flow, store)
        print('証明書を保存しました: ' + credential_path)

    # 認証を行う
    http = credentials.authorize(httplib2.Http())
    app_report_service = discovery.build('admin', 'reports_v1', http=http)

    # GsuiteのAPIを実行
    results = app_report_service.userUsageReport().get(userKey='all',date=in_date).execute()

    for i in extraction(results) :
        print(i)

#
# GSuiteのAPI結果から必要な情報を抜く
#
def extraction(results):
    recodes = []
    for i in results['usageReports']:
        recode = {}

        # レポート日
        recode["day"] = in_date

        # メールアドレス
        recode["email"] = i['entity']['userEmail']

        for l in i['parameters']:
            # 最終アクセス日時
            if 'gmail:last_access_time' in l["name"]:
                last_access = datetime.strptime(l["datetimeValue"], '%Y-%m-%dT%H:%M:%S.000Z')
                last_access = datetime.strftime(last_access - timedelta(hours=9), '%Y-%m-%d %H:%M:%S')
                recode["last_access_time"] = last_access

            # 氏名
            elif "accounts:admin_set_name" in l["name"]:
                recode["name"] = l['stringValue']

            # アカウントに割り当てられた容量(Gmailだけの値は無さそう)
            elif "accounts:total_quota_in_mb" in l["name"]:
                recode["total_mb"] = l['intValue']

            # gmailの使用量
            elif "accounts:gmail_used_quota_in_mb" in l["name"]:
                recode["usage_mb"] = l['intValue']

            # アカウントの使用量(パーセンテージ)
            elif "accounts:used_quota_in_percentage" in l["name"]:
                recode["usage_percent"] = l['intValue']

        recodes.append(recode)

    return recodes
結果
{'day': '2018-12-05', 'email': 'メールアドレス1', 'name': '名前1', 'usage_mb': '13793', 'total_mb': '30720', 'usage_percent': '44', 'last_access_time': '2018-12-05 22:59:14'}
{'day': '2018-12-05', 'email': 'メールアドレス2', 'name': '名前2', 'usage_mb': '1550', 'total_mb': '30720', 'usage_percent': '5', 'last_access_time': '2018-12-05 22:59:12'}
{'day': '2018-12-05', 'email': 'メールアドレス3', 'name': '名前3', 'usage_mb': '7107', 'total_mb': '30720', 'usage_percent': '23', 'last_access_time': '2018-12-05 22:59:13'}
{'day': '2018-12-05', 'email': 'メールアドレス4', 'name': '名前4', 'usage_mb': '6211', 'total_mb': '30720', 'usage_percent': '20', 'last_access_time': '2018-12-05 22:59:14'}
{'day': '2018-12-05', 'email': 'メールアドレス5', 'name': '名前5', 'usage_mb': '30202', 'total_mb': '30720', 'usage_percent': '98', 'last_access_time': '2018-12-05 22:59:45'}
注意
in_date = datetime.today()
in_date = datetime.strftime(in_date - timedelta(hours=48), '%Y-%m-%d')
取得対象日時の指定です。
Gsuiteのレポートは、リアルタイム性はありません。
12/8に前日分の情報を取得しようとすると、スクリプトを回すと以下のように怒られます。
googleapiclient.errors.HttpError: <HttpError 400 when requesting https://www.googleapis.com/admin/reports/v1/usage/users/all/dates/2018-12-07?alt=json returned "Data for dates later than 2018-12-06 is not yet available. Please check back later">
メールだけの正確なチェックではなありませんが、usage_percentが高いユーザーに連絡を行い、事前にデータの整理を行なってもらうように促せます。
SSH接続時にMacのターミナルのプロファイルを切り替える
何故、YAMAHA機器の文字コードはsjis何だろう・・・
と嘆いていましたが、MacのターミナルからSSHの接続先でプロファイルを切り替える方法を記載します。
itermでも同様の事が行えるようですが、sshのconfigのHostname情報と完全一致しないとプロファイルの切り替えがダメそう。
iTerm2でSSHログイン先別にプロファイルを自動的に切替えて事故防止する方法
192.168.x.xはYAMAHAしかないし、複数のL2スイッチ、L3スイッチ、ルーターとconfigを書きたくないんじゃー!という方向け。
- ターミナルのプロファイルを好きに作成します。
今回は、
「honban」 ・・・ Homebrewから複製。背景をゆるキャン△の画像に差し替え
「network」 ・・・ Homebrewから複製。背景は拾ったネットワークチックな画像に差し替え。文字コードをsjinに変更。 -
~/.bash_sshなどに以下のスクリプトを記載します。
#!/bin/bash

# SSH接続先に、「prd」という文字列が入ってたら、本番環境とみなしてターミナルの「Honban」プロファイルを適用する
if [[ `echo $@ | grep 'prd'` ]] ; then
   /usr/bin/osascript -e "tell application \"Terminal\" to set current settings of first window to settings set \"Honban\""
   echo $@
   /usr/bin/ssh -F ~/.ssh/config $@

# SSH接続先に、「192.168」もしくは「172.20」のサブネットであれば、ターミナルの「network」プロファイルを適用する
elif [[ `echo $@ | egrep '192.168|172.20'` ]] ; then
   /usr/bin/osascript -e "tell application \"Terminal\" to set current settings of first window to settings set \"network\""
   /usr/bin/ssh -F ~/.ssh/config $@

# 上記に該当しない接続先は、Homebrewプロファイルを適用する
else
   /usr/bin/osascript -e "tell application \"Terminal\" to set current settings of first window to settings set \"Homebrew\""
   /usr/bin/ssh -F ~/.ssh/config $@
fi
実行権限を付けるのを忘れないように。
chmod +x ~/.bash_ssh
- .bash_profileで、sshコマンドへのaliasを設定します。
最終行に以下を追記します。
alias ssh="~/.bash_ssh $@"
これで、itermのプロファイル切り替えとほぼ同等の事が出来るようになります。
違う点は、sshで接続終了後「ターミナルのデフォルトのプロファイル」に戻らないのは美しくありませんが、他のサーバーに繋ぐと改めてプロファイルが適用されますので、あまり気にしない事にします。
terraform の 変数ファイルの読み込み方法
以前は、variables.tfに
variable "project" {
  default = {
    id          = "zuu-infra"
    name        = "zuu-infra"
    region      = "asia-northeast1"
    description = "create from terraform"
  }
}

variable "domain" {
  default = {
    step       = "common-step.zuuonline.com"
    zabbix-web = "zbx.zuuonline.com"
    relay      = "relay.zuuonline.com"
    redash     = "redash.zuuonline.com"
    zabbix     = "zbx.zuuonline.com"
    grafana    = "grafana.zuuonline.com"
    vuls       = "vuls.zuudev.com"
  }
}
と書いて読み込ませていた為、実行する対象が変わる度にvariables.tfファイルを差し替えしていた。
実ファイルを動かすのは宜しくないので、調べたところ
-vars-file=xxxx.tfvars
実行時とオプションで、ファイルを読み込ませられるようだ。
調べて、色々勘違いしていた事もあり勉強になったので書いておく。
ファイルは以下の3つ
vpc.tf
  └ 実際のリソース定義

variables.tf
  └ -vars-file=c.tfvars で渡された内容を「変数」として定義する。tfファイルと同じ場所に置く

c.tfvars
  └ -vars-file=c.tfvars で渡す。 場所はどこでも良い(tfファイルからの相対パスか絶対パス)
variables.tfは、「変数」として定義するだけなので、
variable "credential" {
    type = "map"
    // c.tfvarsで情報が設定されていない場合のデフォルト値
    default = {
        "auth_file"   = "~/.ssh/dev-project.json",
        "project"     = "dev-project",
        "zones"       = "us-east-1a",
        "description" = "create from terraform"
    }
}
// VPC
variable "vpc" {
    type = "map"
}
このような感じで定義する。
c.tfvars は、variables.tf の typeに合うように変数を書く。
書き方は、以下のどちらでも認識した。
// procject
credential = {
    "auth_file" = "~/.ssh/hoge.json",
    "project" = "stg-project",
    "zones"   = "us-east-1a",
    "description" = "create from terraform"
}

// vpc
vpc = {
    vpc_name = "stg-project-network"
    network  = "172.24.0.0/22"
    autoscale_network_cidr = "172.168.0.0/24"
    autoscale_network_name    = "subnet1"
    autoscale_network_region  = "us-east1"
    none_autoscale_network_cidr = "172.168.2.0/24"
    none_autoscale_name    = "subnet2"
    none_autoscale_region  = "us-east1"
}
最後に、a.tf
これはリソースの定義なので、以前から書いている内容から変更は無いが、念の為に残しておく。
resource "google_compute_network" "vpc" {
  name         = "${lookup(var.vpc, "vpc_name")}"
  description  = "${lookup(var.credential, "description")}"
  auto_create_subnetworks = "false"
}

resource "google_compute_subnetwork" "subnet1" {
  depends_on    = ["google_compute_network.vpc"]
  name          = "${lookup(var.vpc, "autoscale_network_name")}"
  network       = "${lookup(var.vpc, "vpc_name")}"
  ip_cidr_range = "${lookup(var.vpc, "autoscale_network_cidr")}"
  region        = "${lookup(var.vpc, "autoscale_network_region")}"
  private_ip_google_access = true
}

resource "google_compute_subnetwork" "subnet2" {
  depends_on    = ["google_compute_network.vpc"]
  name          = "${lookup(var.vpc, "none_autoscale_network_name")}"
  network       = "${lookup(var.vpc, "vpc_name")}"
  ip_cidr_range = "${lookup(var.vpc, "none_autoscale_network_cidr")}"
  region        = "${lookup(var.vpc, "none_autoscale_network_region")}"
  private_ip_google_access = true
}
GCPのstartupスクリプトでどハマりしたメモ
VM インスタンスの特別な構成これ通りにNATゲートウェイを構築しようとして、ハマった箇所のメモ
実行したコマンドは以下の通り
開発環境なので、一部は手動でコマンドを置き換えています
# startup.sh取得
gsutil cp gs://nat-gw-template/startup.sh .

# インスタンステンプレート作成(nat-1)
gcloud compute instance-templates create nat-1 \
    --image-family=centos-7  --tags natgw \
    --image-project=centos-cloud \
    --machine-type n1-standard-1 --can-ip-forward \
    --metadata-from-file=startup-script=startup.sh --address グローバルIPアドレス1

# インスタンステンプレート作成(nat-2)
gcloud compute instance-templates create nat-2 \
    --image-family=centos-7 --tags natgw \
    --image-project=centos-cloud \
    --machine-type n1-standard-1 --can-ip-forward \
    --metadata-from-file=startup-script=startup.sh --address グローバルIPアドレス2

# ヘルスチェック作成
gcloud compute health-checks create http nat-health-check --check-interval 2 \
    --timeout 1 \
    --healthy-threshold 1 --unhealthy-threshold 2 --request-path /health-check

# インスタンスグループ作成(nat-1)
gcloud compute instance-groups managed create nat-1 \
    --size=1 --template=nat-1 --zone=asia-northeast1-a

# インスタンスグループ作成(nat-2)
gcloud compute instance-groups managed create nat-2 \
    --size=1 --template=nat-2 --zone=asia-northeast1-a

# ルート作成(nat-1)
gcloud compute routes create nat-1 --destination-range 0.0.0.0/0 \
    --tags noip --priority 800 --next-hop-instance-zone asia-northeast1-a \
    --next-hop-instance nat-1-5h46 \
    --network=default

# ルート作成(nat-2)
gcloud compute routes create nat-2 --destination-range 0.0.0.0/0 \
    --tags noip --priority 800 --next-hop-instance-zone asia-northeast1-a \
    --next-hop-instance nat-2-r3kn \
    --network=default
これで、ネットワークタグ「noip」を付けたインスタンスのルートがnat-1 / nat-2 を通って出て行くはず
 while :; do sleep 1 ;date; curl httpbin.org/ip --connect-timeout 1 ; done

2018年 11月 12日 月曜日 18:50:03 JST
curl: (28) Connection timed out after 1005 milliseconds
2018年 11月 12日 月曜日 18:50:05 JST
curl: (28) Connection timed out after 1005 milliseconds
2018年 11月 12日 月曜日 18:50:07 JST
curl: (28) Connection timed out after 1005 milliseconds
ダメじゃん
内容を確認すると、startup.shに記載されている
echo 1 > /proc/sys/net/ipv4/ip_forward
が実行されていない。
何これ?何で?と思いつつ数時間調べたけど、結局原因わからない。
理由は分からないけど、startup.shに
#!/bin/bash
timedatectl set-timezone Asia/Tokyo (追加)
echo 1 > /proc/sys/net/ipv4/ip_forward
iptables -t nat -A POSTROUTING -o eth0 -j MASQUERADE
したらecho 1 > /proc/sys/net/ipv4/ip_forwardも動くようになった。
改行コードか?
時間を無駄にした
Mac+python3.7でSSL: CERTIFICATE_VERIFY_FAILEDが発生する場合の対応
BeautifulSoup4を使った時に発生したエラー
Traceback (most recent call last):
  File "/Library/Frameworks/Python.framework/Versions/3.7/lib/python3.7/urllib/request.py", line 1317, in do_open
    encode_chunked=req.has_header('Transfer-encoding'))
  File "/Library/Frameworks/Python.framework/Versions/3.7/lib/python3.7/http/client.py", line 1229, in request
    self._send_request(method, url, body, headers, encode_chunked)
  File "/Library/Frameworks/Python.framework/Versions/3.7/lib/python3.7/http/client.py", line 1275, in _send_request
    self.endheaders(body, encode_chunked=encode_chunked)
  File "/Library/Frameworks/Python.framework/Versions/3.7/lib/python3.7/http/client.py", line 1224, in endheaders
    self._send_output(message_body, encode_chunked=encode_chunked)
  File "/Library/Frameworks/Python.framework/Versions/3.7/lib/python3.7/http/client.py", line 1016, in _send_output
    self.send(msg)
  File "/Library/Frameworks/Python.framework/Versions/3.7/lib/python3.7/http/client.py", line 956, in send
    self.connect()
  File "/Library/Frameworks/Python.framework/Versions/3.7/lib/python3.7/http/client.py", line 1392, in connect
    server_hostname=server_hostname)
  File "/Library/Frameworks/Python.framework/Versions/3.7/lib/python3.7/ssl.py", line 412, in wrap_socket
    session=session
  File "/Library/Frameworks/Python.framework/Versions/3.7/lib/python3.7/ssl.py", line 853, in _create
    self.do_handshake()
  File "/Library/Frameworks/Python.framework/Versions/3.7/lib/python3.7/ssl.py", line 1117, in do_handshake
    self._sslobj.do_handshake()
ssl.SSLCertVerificationError: [SSL: CERTIFICATE_VERIFY_FAILED] certificate verify failed: unable to get local issuer certificate (_ssl.c:1051)

During handling of the above exception, another exception occurred:
解決策:
$ /Applications/Python\ 3.7/Install\ Certificates.command
参考:
https://qiita.com/orangain/items/0a641d980019fd7e0c52
最新バージョンのgitをインストールする
最新バージョンはここから確認する
環境はGCPのCentOS7
yum groupinstall 'Development Tools'
yum -y install zlib-devel perl-ExtUtils-MakeMaker

cd /usr/local/src
wget https://mirrors.edge.kernel.org/pub/software/scm/git/git-2.9.5.tar.gz
tar zxvf git-2.9.5.tar.gz
cd git-2.9.5
./configure --prefix /usr/local/git-2.9.5
make
make install
git --version
git version 2.9.5
上場したてのベンチャー企業に中途入社して5ヶ月で辞めました
タイトルの通りの退職エントリーになります。
2018年3月1日から株式会社ZUUでお世話になっていましたが、2018年8月末をもって退職する事になり、29日が最終出社でした。
21歳の時からIT業界に身を置いてきましたが、たった5ヶ月という最短記録を更新する状況になり、決断が早すぎたかもしれないと少し感じます。
辞めた経緯を以下に記載しますが、会社が悪いと批判するつもりは無く、事業自体はとても面白い事をやろうとしている会社だと思います。
ただ、私がベンチャー企業に求めていた事と、会社の考えの違いがあまりにも大きく、それについて幾度となく改善の指摘をしても変わる気配が無かった。
それだけの事です。
ベンチャー企業に求めていた事
”一緒に”作り上げていく面白さ
前職は韓国の大手ゲーム会社の子会社で働いており、何故か日本法人の仕事も見るポジションでした。
そこで感じたのは、セクショナリズムがゴリゴリに強く、検討についての議論が一切出来ない。というものでした。
(申請ベースで作業依頼が届き、必要性や用途のヒアリングして構築する。作業レイヤーもOSのチューニングまでとシンプルかつ面白味も無い)
ベンチャーと言う言葉に夢を見ていたと言われればそうかも知れませんが、ZUUの開発部門は正社員、契約社員、業務委託の合計で8名程度の小規模のチームにも拘らず適切な情報共有もない状態で、来週・来月に何をやらなければならないのか?がチーム内で共有されず、不明瞭なまま動いている状態でした。
企画者や中間層の会議で「○○やりたい!」「いいねぇ!」などが話され、そのまま開発に降ってくる。という状況でしょうか。
私がやりたかったのは、その会議の中で一緒に決めていく事でしたが、在籍していた5ヶ月間の間で他部門と会議を行った事は1度もありません。
bigquery事件
一番ビックリしたのは、DMPツールとしては他の製品を使っているにも拘らず、「ドヤりたいからbigquery使いたい!」でした。
bigqueryを使って何を分析するのか?が目的になっていないので、要件なんてありません。
とりあえず、既に一部をDMPツールに送信しているアプリケーションのログをbigqueryにも送り始め、re:dashで可視化させたり集計してスプレットシートに吐いたりとやりましたが、意味があるのか無いのか未だに分かりません。
cockroachDB事件
仕様決め、共有が無いのが1番辛かったです。
百歩譲って、構成や使い方に変動がないケースで共有が無かったり遅れる場合は、まだ理解出来ます。
開発環境が各個人のDockerの為、インフラに頼らなくても開発には支障がないでしょうが、
開発のプルリクエストでチラ見して気づいたcockroachDBの導入についても「インフラとして調査すらしてないよ?」とかもありました。
その時は、さすがに頭に来てしまい、
と、口汚くslackで上司に話を投げましたが、この回答があり非常にガッカリした記憶があります。
他部門との会議は基本的に室長が行なっており、そこで決まる仕様や要件などフィードバックが無い。
なぜ数名しかいない開発チームなのにコミュニケーションロスが生じるのか?
とても理解に苦しみます。
これらのやり方が変わらない限り、ZUUにエンジニアが定着する事は無いと思います。
リファラル採用も募集していましたが、こんな劣悪な体制に知り合いエンジニアを売るような事は出来ません。
開発を外注するにしても、社内で仕様や要件を決められない為、それも難しいでしょう。
(高額なSIerにお願いすれば別ですが)
次は何するの?
またベンチャー企業と呼ばれる環境に身を置きたいと思っているので、次の転職先もZUUと同じ規模の会社になります。
次こそ”一緒に作り上げて行ける”ように、頑張りたいと思います。
grafanaでワールドマップを利用する
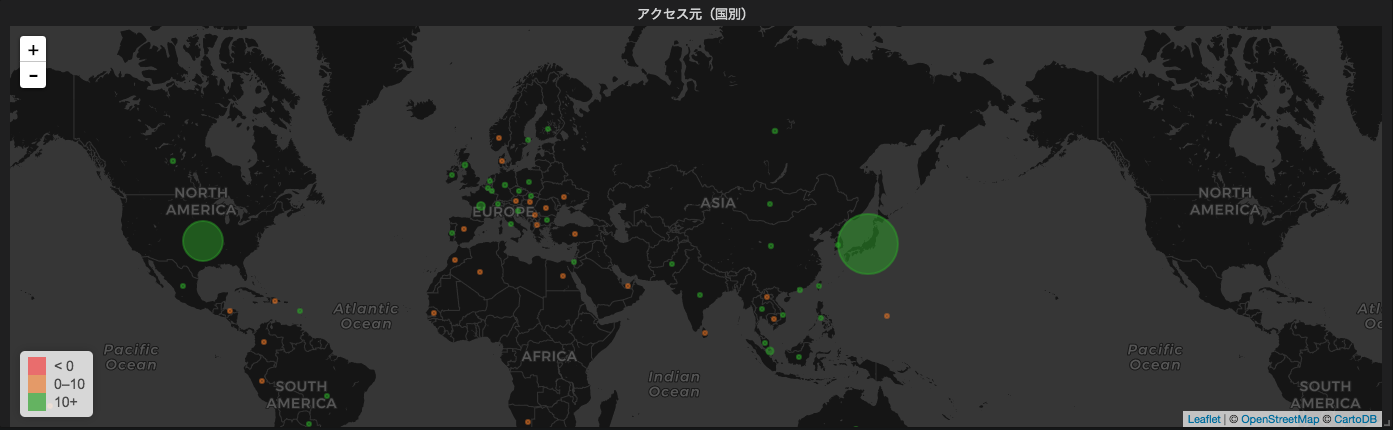
grafanaでworld map プラグインを使ってみたので備忘録
マッピングデータは、MaxMaindさんが提供してくれているものを使います。
https://dev.maxmind.com/ja/geolite2/
ElasticSearchを使う方法が一般的みたいですが、ざっくり国別データを集計したいだけなので、MySQLで行きます。
また、アクセスログもInfluxDBではなくMySQLです。
【環境】
python3.4
Mysql 5.7
maxminddb 1.4.1
まずはモジュールインストールと、マッピングデータの取得
pip3 install maxminddb
wget http://geolite.maxmind.com/download/geoip/database/GeoLite2-City.mmdb.gz -P /usr/local/src
MySQLにテーブルを作る
CREATE TABLE `geo2` (
  `ip_address` varchar(15) DEFAULT NULL,
  `country_name` varchar(50) DEFAULT NULL,
  UNIQUE KEY `ip_address` (`ip_address`)
) ENGINE=InnoDB DEFAULT CHARSET=utf8
pythonスクリプトを作る。
vim /usr/local/bin/insert_get2.py
#!/usr/bin/env python3
# -*- coding: utf-8 -*-
import MySQLdb
import os
import maxminddb
import datetime

DBFILE = '/usr/local/src/GeoLite2-City.mmdb'
geo2db = maxminddb.open_database(DBFILE)

# 直近1時間前のログからデータ集計を行う
todaydetail = datetime.datetime.today()
starttime = (todaydetail-datetime.timedelta(hours=1)).strftime("%Y-%m-%d %H:00")
endtime   = todaydetail.strftime("%Y-%m-%d %H:00")

def geo2(ips):
  val_list = []
  for ip in ips:
    try:
      location = geo2db.get(ip)
      # 国
      country = location["registered_country"]["iso_code"]

      # 経度と緯度も取得出来るけど今回は使わない
      # 緯度
      # latitude = location['location']['latitude']
      # 経度
      # longitude = location['location']['longitude']

      val_list.append([ip,country])
    except:
      pass

  return val_list

def db_select():
  con = MySQLdb.connect(
    host='localhost',
    db='log',
    user='DBユーザー',
    passwd='パスワード',
    charset='utf8'
  )

  cur = con.cursor()
  sql = "select distinct remote_ip from log where time between '{start}' and '{end}' and remote_ip != '::1'".format(start=starttime,end=endtime)

  result = cur.execute(sql)
  ips = []
  for ip in cur:
    ips.append(ip[0])

  cur.close()
  con.close()
  return ips


def db_bulk_insert(rows):
  con = MySQLdb.connect(
    host='localhost',
    db='log',
    user='DBユーザー',
    passwd='パスワード',
    charset='utf8'
  )

  cur = con.cursor()
  sql = "INSERT IGNORE geo2(ip_address,country_name) VALUES(%s, %s)"
  cur.executemany(sql,rows)
  con.commit()
  cur.close()
  con.close()

ips  = db_select()
rows = geo2(ips)
db_bulk_insert(rows)
あとは、/usr/local/bin/insert_get2.pyを1時間毎に実行する。
GCEインスタンスでpostgresqlをフェイルオーバーさせる
GCEでは、単一インスタンスに同一ネットワークのIPアドレスを複数持たせる事ができない。
複数のネットワーク インターフェースの概要と例
つまり、Virtual IPを同一セグメントに持たせた構成は出来ない。
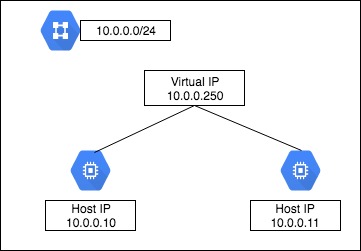
クラスタを組みたかったけど、今回の要件としては
1. Active/Standbyの構成にする
2. Activeのpostgresが止まった場合、Standbyを昇格する
3. フェイルバックは行わない。
4. フェイルオーバー後、App側で検知。
   必要な設定変更後、動的にサービスの再起動を行う。
5. 1分以内にサービスが復旧される。
とシンプルな構成にする。
PostgreSQL
要件1、2には、pg_keeperを使う。
クラスタでは無いのでスプリットブレインの検知などは出来ない。
その為、アプリケーション側に今のActive機の情報を教える必要がある。
スプリットブレイン対策用のDB、Table作成
postgres=#  create database pg_state;
postgres=#  create table failover_log (unixtime int, host varchar(10));
インストール(Actice/Standby共に)
cd /usr/local/src

git clone https://github.com/MasahikoSawada/pg_keeper.git

export PATH=/usr/pgsql-9.6/bin/:$PATH

make USE_PGXS=1

make USE_PGXS=1 install
postgresql.conf書き換え(Actice/Standby共に)
vim postgresql.conf

shared_preload_libraries = 'pg_keeper'
pg_keeper.my_conninfo = 'host=10.0.0.10 port=5432 dbname=postgres'
pg_keeper.partner_conninfo = 'host=10.0.0.11 port=5432 dbname=postgres'
pg_keeper.keepalive_time = 2
pg_keeper.keepalive_count = 3
pg_keeper.after_command = 'sleep 1 ; psql -d pg_state -c "insert into failover_log values(`date +%s`, \'`hostname`\');" -x'
Activeが止まった場合、pg_keeper.keepalive_time秒 × pg_keeper.keepalive_count回 チェックを行い、全てNGの場合にフェイルオーバーを実行し、最後にpg_keeper.after_commandの内容が実行される。
今回は、フェイルオーバー後に[unixtimestamp, hostname]を pg_state.failover_logに入れている。
app側
これはアプリケーションのよるので参考まで。
monitor_master_db.pyというモニタリングスクリプトを作成し、root権限で動かす事にした。
動きとしては、Active/Standby両機のDBのpg_state.failover_logをチェックし、タイムスタンプが若い方をDB接続先として、設定ファイル(yaml)を書き換えデーモンの再起動を行う。
#!/bin/env python3

import os,sys
import yaml
import psycopg2
import codecs
import subprocess

yaml_file = '/PATH/TO/env.yaml'
dbs = ['postgresql://postgres@db01:5432/pg_state'
         ,'postgresql://postgres@db02:5432/pg_state']

def get_item():
    arr = []
    for db in dbs :
        try:
            dbcon = psycopg2.connect(db)
            cur = dbcon.cursor()
            cur.execute('select * from failover_log order by unixtime desc limit 1')
            result = cur.fetchone()
            cur.close()
            dbcon.close()
            arr.append(result)
        except :
            pass
    if len(dbs) == len(arr):    # Active/Standby共にデータ取得成功
        if arr[0][0] > arr[1][0]:
            return arr[0][1]
        else :
            return arr[1][1]

    else :                             # 片系が停止している
        return arr[0][1]


def overwrite(db_name):
    with codecs.open(yaml_file, 'r', 'utf-8') as read :
        env_dict = yaml.load(read)

        if env_dict['db_master'][0]['address'] != '{}:5432'.format(db_name) or env_dict['db_slave'][0]['address'] != '{}:5432'.format(db_name):
            env_dict['db_master'][0]['address'] = '{}:5432'.format(db_name)
            env_dict['db_slave'][0]['address'] = '{}:5432'.format(db_name)

            with codecs.open(yaml_file, 'w', 'utf-8') as write :
                yaml.dump(env_dict, write, encoding='utf8', allow_unicode=True, default_flow_style=False)

            try:
                subprocess.check_call(["systemctl", "restart", "デーモン"])
            except :
                pass
作成したmonitor_master_db.pyをcronで動かす。
cronは普通に書くと1分が最小の実行単位だが、以下のように書くと5秒単位でスクリプトを実行してくれる。
# 5秒間隔
* * * * * for i in `seq 1 12`;do sleep 5; python3 /usr/local/bin/monitor_master_db.py; done

# 10秒間隔の場合
* * * * * for i in `seq 1 6`;do sleep 10; python3 /usr/local/bin/monitor_master_db.py; done
この状態で、Active側のDBを落として、フェイルオーバーされApp側の接続先も変更される事を確認する。
Slave側が昇格前にfailover_logへのinsertが実行される場合、pg_keeper.after_commandのsleepを大きくする。
pg_keeper.after_command = 'sleep 5 ; psql -d pg_state -c "insert into failover_log values(`date +%s`, \'`hostname`\');" -x'